Tuesday, August 31, 2010

Fun with fermentation, Part I - sauerkraut

There are many ways to preserve food, including fermentation.  I'm not talking about that pulsating container in the back of fridge.  I mean controlled, purposeful fermentation.

Right now there are 2 jars of crappy wine in my attic stairwell, which I've left there in the hope of turning them into vinegar.  The last time I checked there was nothing happening.  I've read it can take up to 6 months, so keep your fingers crossed.  And if it does nothing, I'll just chuck it since the ingredients cost me nothing.

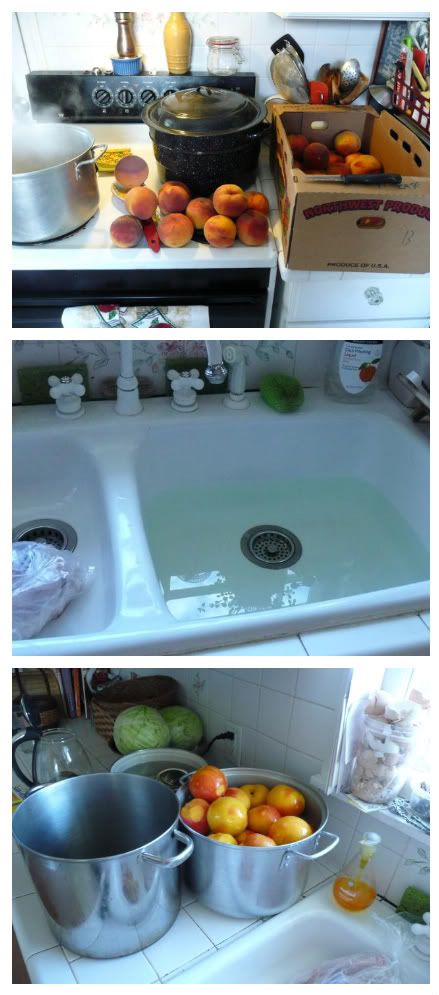
This is the time of year to ferment cabbage and cucumbers.  The harvest is coming in and the temps are perfect for those little beneficial bacteria to burp and binge.

"Sauerkraut" is German for "sour herb" or "sour cabbage".  Today I'll teach you how to prepare cabbage to encourage fermentation.  We'll can it once it's all done so that it's a shelf-stable topping for brats later this winter.

Ingredients:
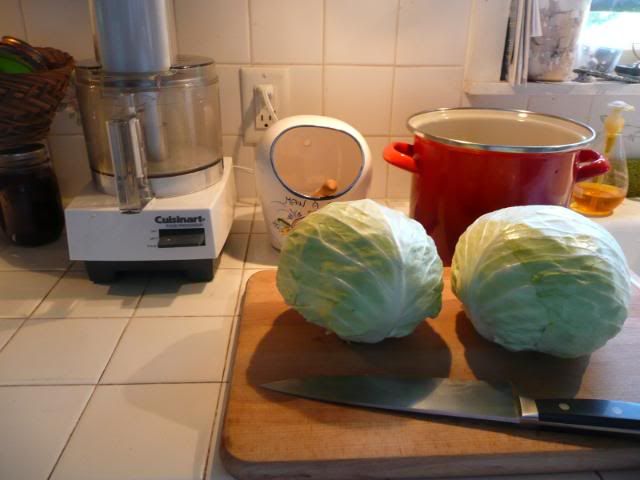
2 heads of fresh cabbage (roughly 5 pounds)
3 T salt
(if you prefer a spiced version, try Alton Brown's)

Equipment:
Large knife
Cutting board
Food processor fitted with a slicing blade
A large non-reactive bowl or pot you can live without for a few weeks
Plastic zipper bag, gallon size

Directions:
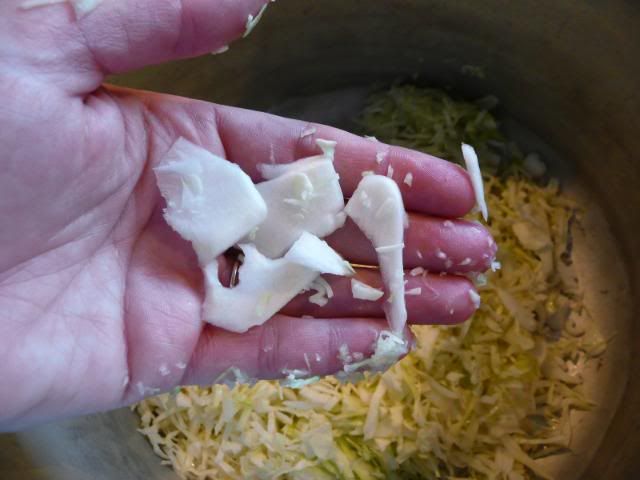
Core the cabbage heads.  Slice the heads into sizes that will fit into the food processor feed.

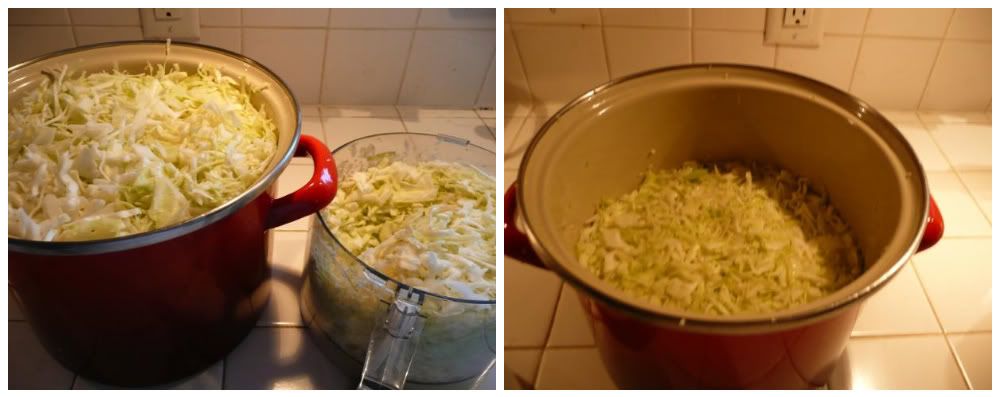
Shred the cabbage and place in a large container. Pick through the cabbage as you dump it into the bowl and discard any large chunks.  You can add the salt as you go along or get a second pot dirty (as I did) and transfer it back.

It will look like the cabbage isn't going to fit.  I promise it will.  If it doesn't fit right away, go do something else for 15 minutes  When you return the cabbage will have shrunk.

Turn the cabbage every so often for the next hour or so.  The salt will extract the juice of the cabbage and soon the cabbage will be underwater.  If not, have faith: in a day or two the cell walls will break down and create a briny liquid for the cabbage fermentation.  If there's still not enough liquid to cover the cabbage, make some brine using 4 1/2 t salt and 4 cups of boiled/cooled water.

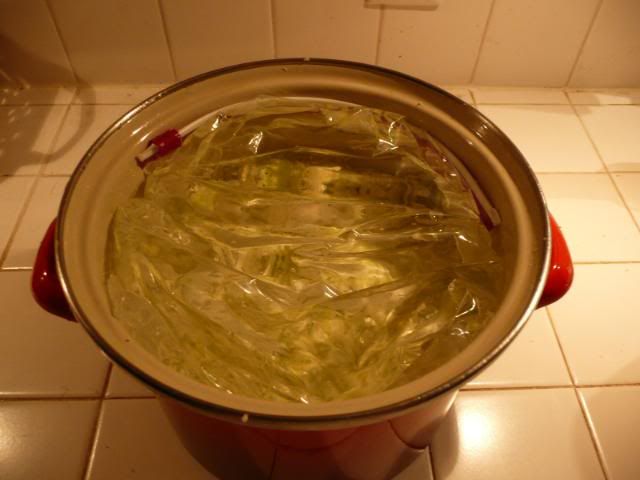
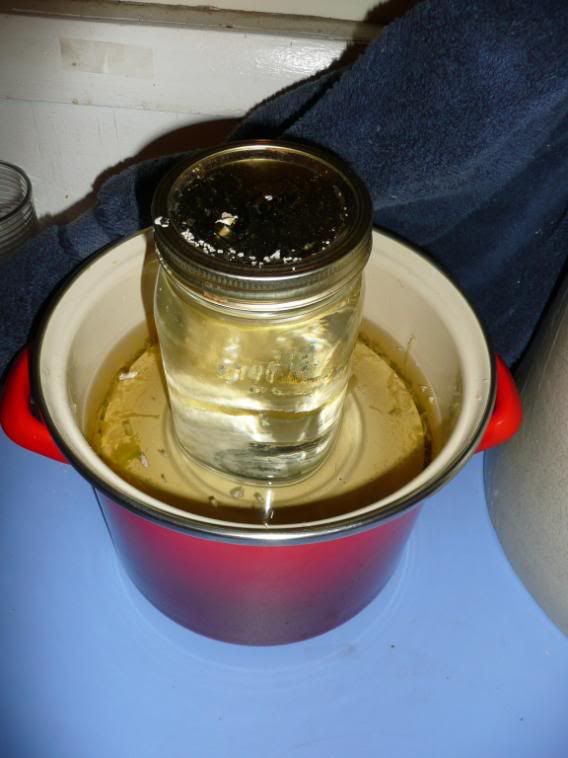
The next thing you want to do is keep the cabbage submerged.  There are 2 ways you can go about this.  The thing I'm trying this year is a plastic baggie filled with brine (why brine?  If the bag leaks you won't dilute the brine in the kraut).  It also serves to seal the top of the container, helping reduce mold and scum growth.  In past years I've used a plate and a glass jar filled with water to hold it down.  That's the method I'll use for the pickles I'm going to make.

All you have to do now is put the kraut in a room that's 65-75 degrees and wait.  Check on our kraut every day.  Use a slotted spoon to skim off any scum that forms on the surface.  Dunk the spoon into a jar of clean water to get it off the spoon.  You'll probaby want to keep it somewhere out of the way because it will smell like... well, it's going to smell like fermenting cabbage.

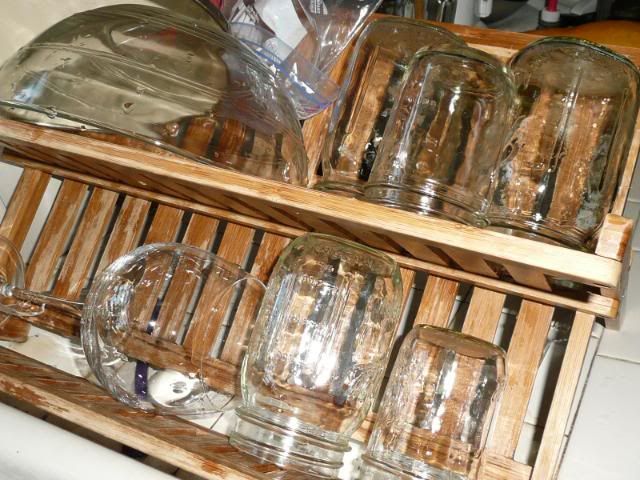
Here's a pic of a sauerkraut batch from 2007.  Notice that the cabbage is completely submerged.

When the murky concoction stops bubbling you'll now be the proud owner of sauerkraut.

I'll check back with you when my sauerkraut is ready to be canned. 

**This is the WRONG WAY to remove the shredding blade from a food processor.**
Until then, here's a note of caution about the food processor.  Last year my thumb slipped as I tried to remove the blade with one hand, pulling the pad of my thumb right into the very very sharp blade.  Two urgent care visits later (1 to close the wound, 1 to re-open it when it developed an infection), and a nasty scar on the fleshy part of my right thumb I now have a scar that feels like a pea under the surface and limited sensation in that part of my finger.

Learn from my dumbassery.  Digital sacrifice is not necessary for a respectable sauerkraut.

Monday, August 30, 2010

Shallots

These are my shallots.

That doesn't look too bad, right?

Wait, here's a picture to give you a sense of scale.

Lousy summer.  I saw on the news the other day that by this time in an average year we've had 54 days above 75 degrees.  At the time of the broadcast the count was a piddly 25 days above 75.

Alas, such is the life of a gardener.  Some years we get incredible returns on our investments of time and money.  Other years we get shallots the size of peas.

Whatever shall I do with my half ounce of shallots...?

Sunday, August 29, 2010

No potato famine here

About 2 weeks ago I decided it was time to dig up the potatoes.  How do you know when the potatoes are ready?  The vines start to die back.  Mine never ever flowered.

This was my haul.  I was positively giddy as my hands pushed aside the dirt to reveal these behemoths.  The thing about root vegetables is that you never know what's going on under the dirt until you look.

There are russets, red potatoes, and fingerling potatoes.  The russets & 90% of the reds came from 6 plants grown in a 4'x3' section of a raised bed on the parking strip.  The front yard harvest filled a big bucket and part of one of these boxes. 

The spuds from the back yard were not impressive.  That's where I planted about 18 plants in an area that measured roughly 8'x8'.  What a disappointment.  In fact, the poor showing in the back yard has made me decide to give up on veggies there and to plant grass.  I dislike having grass but now that we have a dog we need the room for Rosemary.

Check out the size of this beast of a russet potato!  We got several this size, with the other russets averaging about the size of a computer mouse.  (Isn't it weird that we used to compare things to the size of a potato and now it's to technological equipment?)


The red potato crop was also good, with some the size of a fist and others the size of a marble.  We've had a few and they're very good.

Fingerling potatoes are one of my favorites because of size and buttery sweetness.  It's the crop to which I devoted the most space but which produced the fewest spuds (I'm blaming our cold summer and shady location).  Last week I bought some lamb shanks at the farmers market and will eventually serve these potatoes with the lamb.  They'll be my special occasion potato.

I'm storing my potatoes in these cardboard boxes, which ones held fresh berries and are well ventilated.  The boxes are, for now, in my canning pantry but will move to my "pantry" (it's really just the stairs to the attic) once our weather cools.

There are lots of ways to enjoy your freshly dug potatoes:

GRILLED - slice into 1/2" cuts, toss with oil, grill on med heat for 7-8 mins/side

FRIED - dice, fry in oil for 20-30 mins, drain and toss with minced garlic and rosemary, then use a microplane to shred Parmesan over the top, salt and pepper to taste

BAKED - poke with a fork and bake for 30-45 minutes or until yielding to a fork
My chives are finally hearty enough to survive regular trimming.  Perfect on potatoes!

BOILED - select potatoes that are the same size, cover with water and boil for about 20 minutes, serve with butter

The Pioneer Woman posted this recipe a while back where she boiled red potatoes, smashed them with a fork, and then baked them.  I think I'll have to try it soon and report back to you how it went. 

Watch the blog for some quiches with potatoes and broccoli, which has also grown well.

Saturday, August 28, 2010

Peaches and Vanilla-Peach Jam

Canning Peaches
subtitle: "How to make your entire kitchen sticky"

Last Thursday I bought 2 22-pound boxes of peaches from 2 different farm stands.  Each told me that the peaches needed a few days to ripen, so I left the peaches in the carport until Sunday afternoon.  Strangely, the box that was open to the air ripened better than the one that was closed (ripening fruit gives off ethylene gas, which in turn helps speed the ripening of the rest of the fruit).  I used the less-than-perfectly-ripe fruit for jam and canned the ripened peaches in a light sugar syrup.


Peaches were the first thing I ever canned.  They're easy to can, requiring no ingredients other than sugar and water, and the steps are straight-forward:

1. Peel, pit, and halve peaches.  This is the most complicated part because peeling peaches means dropping them into boiling water for 1-3 minutes then shocking them in cold water to loosen the skin.  I sliced my thumb on a peach pit, so be careful.

2. Put peach halves into a syrup.  I make an extra-light syrup (1.25 cup sugar to 5 cups water), and bring to a simmer.

3. Pack peaches into sterile jars and process for 25-30 minutes, depending upon the jar size.
That's it, though time-consuming.  Processing all those peaches and making the jam below (which I did at the same time) took me about 4 1/2 hours.  This is not a project you do on a lark.

Sometimes a jar breaks.  When this happens, just throw it and the contents away (other jars are fine).

Two years ago I went for a picnic with my friend, Bonnie.  She whipped out a jar of vanilla-peach jam she'd gotten at the grocery store.  The jam was incredible!  We slathered it on crackers with cheese and loved every second of it.  Months later when it was peach-canning time I decided to replicate that jam and made two batches.  It became my favorite of all the jams I've ever made (with the sol exception of blueberry conserves) and it a wonderful gift jam because it's so distinctive.  People seem to appreciate gourmet jams more than simple ones.  It's strange, really.

My last jar got traded for some rhubarb so this year I had an excuse to make it again.

Vanilla-Peach Jam
4 cups diced peaches
1 box powdered pectin
1 vanilla bean, split and caviar removed
2 T lemon juice (use the stuff from a bottle to guarantee acidity)
5 cups sugar

Makes roughly 6 half-pint jars or 3 pint jars.

Start by sterilzing your jars, rings, and tools.  The easiest way to do this is to place them in the canning kettle as you bring the water to a boil.  Put the lids in a bowl and cover with the hottest tap water you can get, but not boiling water: you want to soften the rubber but not ruin it.

Put the peaches in a large, tall, non-reactive pot (no aluminum: use stainless steel or enameled pots only).  Whisk in the pectin, vanilla caviar and bean, and lemon juice, then bring the fruit to a boil over high heat.  Add the sugar all at ounce and bring to a rolling boil (meaning you can't stir it down) for 1 minute.

Leave the jam on the counter for a minute or so while you get the jars ready to be filled.  Stirring the jam one last time before filling the jars will help the fruit distribute evenly throughout the jam and prevent floating.

Cut up the vanilla bean and put a segment of the bean into each jar.

Pour the jam into the prepared jars and load the canning kettle.  Once the water is back to a hard boil, plop on the lid and set your timer for 5 minutes.

After the timer dings place your jars on the counter (I usually put mine on a wooden cutting board because we have ceramic tile and I don't trust the temperature difference not to crack the jars).  Don't disturb the jars for 24 hours.  If you don't have the countertop space to space you can put the jars back into the peach boxes, leaving space for air to circulate, and place the boxes out of the way.

Remember to label the jars.  My day's work and 40 pounds of peaches yielded:
10 quarts plain peaches
6 pints vanilla peaches
6 half-pints vanilla-peach jam
2 pints peach juice (why throw it away??)
A package of  peaches in the freezer to be made into vanilla-peach jam another time.

p.s. Happy birthday to me!

Friday, August 27, 2010

Squash blossom end rot and a recipe

Quite a while ago I posted about blossom end rot on squash.  I've lost a few squash to it despite my efforts to the contrary, so thought I'd show you what it looks like.

Beginning stage:

Note the whitish-grey area near the blossom.  That's a very early indicator of the pending rot.

Advanced rot:

When you find this in your garden, just cut off the offending fruit and toss them.  The plant will be fine and will likely produce other fruits that are just fine.

We've been eating lots of squash lately.  I've been grilling them.  Just cut 1/2" slices on a diagonal, toss with olive oil, and put them on a medium-heat grill for about 4-5 minutes per side.  Top with salt and pepper for a fast and healthy side dish.

Thursday, August 26, 2010

Post-commuting free time

Since trading my job 38 miles away for one that's a mere 3.3 miles from home, I've been asked countless times: "what do you do with all your spare time?" 

In my old job I got up at 6:30, left the house at 7:12a to catch a bus to Seattle, worked from 8:30-5, caught the 5:08p bus home, arrived home around 6:30, made and ate dinner by 7:30, then vegged until my 10p bedtime.  I wasn't particularly productive, especially in the winter when the daylight hours are basically 8-4:30 in Western Washington.  Spending 2 1/2 hours per day on a bus really sucks the life out of you.

Yesterday I decided to jot down what I do in a typical day, it being fairly typical, because I was curious how my new life compares.

7:00 - get up, get ready for work
7:50 - leave for work
8-4:25 - work
4:25 - scoot out a few minutes early sp I can get to glass store that closes at 5
4:35 - dash home to grab the window I'm refurbishing, the dog, and the chisels I want to return at Lowe's
4:50 - arrive at the glass store, order new piece of glass to replace this one
5:15 - arrive at Lowe's, get refund, mentally figure out how much the solid hardwood flooring would cost for the piece that's missing in the living room (the furnace intake used to be there at some point), buy some pickle crisp for the cukes my mom is buying for me tomorrow
5:50 - get back home, collect chicken eggs, squirt the neighbor's barking barking barking dogs with vinegar diluted with water, preheat BBQ, turn on canning water to finish the last batch of vanilla-peach jam
5:55 - get dinner ready for the grill: whole chicken and roasted corn from farmers markets, red potatoes from our garden
6:15 - put away dry pots and pans from yesterday's peach-canning spree, wash some jars for the vanilla-peach jam
6:25 - hubbie gets home and finds that Rosemary has eaten all the cat food, cross "feed dog" off the to-do list
6:30 - delight in telling hubbie that the spray bottle of "Canine Shutter-Upper" (patent pending) is working, hope that neighbors don't notice their dogs smell like vinegar
6:32 - realize that the jam fixings had been frozen so jars and canning water are not useful tonight
6:35 - take out recycling and trash, flip dinner on grill
6:40 - come back into house and squeal with glee upon discovering that hubbie has swept
6:41 - shred cabbage for sauerkraut and take pics for blog
7:05 - timer dings for dinner - ignore it until cabbage for sauerkraut is salted
7:10 - get dinner off the grill, plate it, pop open a hard cider, watch some TV for a bit
8:00 - transfer the sauerkraut into its resting spot for the next few weeks, put away dinner dishes, prepare leftovers for lunches tomorrow
8:20 - check to see if chickens are put away (they aren't), start this blog post
8:38 - take Rosemary outside to pee, lock up chickens, notice they're nearly out of food so refill the feeder
8:45 - start the dishwasher and settle in to watch "It's Complicated" with the hubbie (very, very funny movie)
10:45 - brush teeth and hit the hay

If I had any spare time, I'd probably read or knit but it seems I'm wasting it on sleep.

On a final note, happy 38th anniversary to my parents!

Wednesday, August 25, 2010

Roasted Eggplant Pasta

If you don't know by now, I'm a sucker for a farmers market.  I frequent them all summer and buy the vast majority of our perishable food straight from the people who raised it.

The gorgeous piles of eggplants this time of year are very enticing, even though eggplant isn't my favorite thing.

This one made me snicker.  I paid a buck and took it home.

I had evil intent for the little eggplant.  I chopped and diced and sliced!  The carnage required the sacrifice of 1 onion, 3 tomatoes, and 4 cloves of garlic.  It got roasted in a 400-degree oven for 35 minutes with some olive oil, salt, and pepper. 

Use a silpat for easy clean-up.  Don't have one?  Go to a restaurant supply store and buy 2 sheet pans and one large silpat, which you can cut in half.  My hands shook in fear when I cut my brand new $25 silpat.  Know what?  Two years later, I still have 2 silpats and they work just as well as 2 $20 silpats.

While the veggies are roasting, boil some rigatoni noodles.  Save 4 cups of the pasta water.

Puree the roasted goop in a food processor.

Try not to trip over the pooch, who, despite her meager 22 pounds, makes the kitchen much smaller due to her penchance for lying smack dab in the middle of the work triangle.

Put your pureed veggies into a sauce pan over medium-low heat.  I added some pepper flakes at this point for heat.  Mix in the pasta water about a half a cup at a time until you get a consistency like a regular pasta sauce.  Look how much water this took: well over 2 cups.

Dump the pasta into the sauce and toss to coat.  Top with shredded basil and Parmesan cheese.  I served this with a small veal patty I found languishing in the freezer.

UPDATE: I made this again for dinner last night and used canned tomatoes.  It worked great!  I reserved the juice, roasted the tomatoes with the rest of the stuff, and then added the tomato juice and pasta water to the sauce.  Perfect and no waste.  Gotta love that.

Tuesday, August 24, 2010

Recent egg recall

The recall of millions upon millions of eggs got me thinking: are the eggs from my flock safe?  I believe they are.  I tell people they are.  But to be sure, I contacted MyPetChicken, which is where I got my chicks, to ask if they certify that their hens are salmonella-free.

Here's their response (emphasis mine):
Thanks for contacting My Pet Chicken. We test Salmonella-pullorum-typhoid clean, and are H5/H7 AI monitored.  Salmonella is more of an issue with factory farmed birds, because the conditions they are kept in are simply terrible.  In fact, this isn't an illness that passes hen to hen at all, but is usually passed when hens eat rat droppings.  Yuck.

Presuming you are keeping your hens in clean conditions with fresh food and water, it is doubtful they would contract salmonella.  A hen sick with salmonella would be immediately obvious to you: weak, purple-combed, diarrhea, reduced egg production. The illness was probably obvious to those at the factory farm, too--even if they didn't notice one more symptom of the many in their abused hens, surely they would have noticed the drop in production--so it's sort of terrifying to think they just kept selling their eggs.  Worse, the supplier of the two factory farms on which the recent outbreaks occurred apparently has a long history of violations:

http://www.huffingtonpost.com/2010/08/22/egg-recall-supplier-violations_n_690400.html
If you are worried that your hens somehow have contracted this illness, you can always have them tested, but my guess is that eating your hens' eggs is probably the safest thing you or your friends could do.  Actually, this salmonella outbreak on a commercial factory farm is another good reason to keep your own hens, because you can monitor their health personally, and you can control what feed they eat and the conditions they live in.  You can see when they may need medical attention.  If you know anything about factory farms, the surprising thing here is not that there was an outbreak, but that there aren't many, many more.  Those poor chickens.
Best,
Lissa
http://www.mypetchicken.com/
I can confidently say that my hens are all healthy, as evidenced by perky appearances and alert behavior. 

And so, yes: my hens are salmonella-free.

Buttermilk pancakes with boysenberry syrup

I can't make boysenberry syrup and then NOT show you what I plan to do with it!

We had blackberry pancakes with boysenberry syrup.  We moaned a lot and talked very little.  I think you'll do the same.

For the pancake better (recipe adapted from Cooking Light), mix together:
1 cup flour
2 T sugar
1 t baking powder
1/2 t baking soda
pinch salt
1 cup buttermilk
1 T vegetable oil
1 egg, lightly beaten

Use a ladle to measure out your pancakes onto the griddle.  That a trick I learned from my dad.

I'd bought some blackberries and we needed to eat them, so into pancakes they went.

We always - ALWAYS - heat up the syrup for pancakes.  What's the point of steaming hot pancakes if you pour cold syrup onto them?  I thought everyone did this until a friend once expressed surprise at the hot syrup.  But beware: syrup boils over very fast in the microwave.  Do it 30 seconds at a time.

Are these not 100% delectable?

It took everything I had to resist licking the plate.

Monday, August 23, 2010

Boysenberry syrup

Berries are nearly at their end here in Western Washington, so I'm doing everything I can to eat them fresh and preserve them for posterity.  Or January.

These boysenberries called to me from the stand at the downtown market I frequent.  "Jennn... JENN!  Eat us!"  The stand owner was yelling "hey, buy those first!"  Whatever.

Once at my home with my boysen-bounty I was faced with a dilemma of choice: what to do with these lush and juicy berries? 

Jam?  Nah - I have plenty.

Cobbler filling?  No - it would only make one.

Boysenberry syrup?  Ding ding ding we have a winner!

When I was a kid my dad always made breakfast on Saturday mornings.  Sometimes we had bacon and eggs, sometimes muffins, sometimes blueberry pancakes.  On days when pancakes were on the menu, boysenberry syrup was usually offered alongside the maple syrup.  That thick, sweet, purple sauce was invariably the Smuckers brand.

If you're a beginning canner, this recipe is perfect for you.  It's easy, quick, and you really can't mess it up like a jam because you don't have any pectin to manage.  Heck, if you ever make a jam that doesn't set, call it a syrup and nobody will be the wiser.

Boysenberry Syrup recipe from FineCooking.com.
  • 3 cups fresh berries (blueberries, raspberries, strawberries, or blackberries will also work), washed and trimmed as needed and halved if large
  • 1-2 cups granulated sugar
(If you want to can this syrup for long-term shelf-stable storage, please see the website for the how-to.)
In a medium heavy-duty saucepan, crush the berries with a potato masher. Add 1/4 cup water (if using strawberries, add 1/2 cup water). Bring to a boil over medium-high heat, reduce the heat to medium low, and simmer until the berries are very soft and juicy, about 5 minutes.

Set a fine sieve over a bowl. Pour the berry pulp into the sieve and allow the juice to drip through. Gently press the pulp with a rubber spatula to extract as much juice as possible, but don’t press so hard that you force the pulp through.  (I used a food mill in this step, then passed the pulp through a sieve.)

Clean the saucepan. Measure the juice and then pour it into the saucepan. For every 1/4 cup juice, add 1/4 cup sugar. Bring to a boil over medium heat, stirring to dissolve the sugar. Reduce the heat to low and simmer until the syrup is viscous but still runny, about 1 minute. Skim the foam with a spoon and pour the syrup into clean jars.

If you're not canning the syrup, put the jars on a wire rack and let cool to room temperature. Syrup that's not hot-water processed (canned) will keep in the refrigerator for up to two weeks.

That ruby red is so pretty!

Monday, August 16, 2010

Squash & Windows

A few of my yellow squash got away from me:

Oops.

The front garden is going gang-busters.  I dug up a 5-gallon bucket of potatoes recently and tonight we'll have the gorgeous head of broccoli that is looking perfect.

Last weekend I spent many hours refurbishing one of the original double-hung sash windows in our 1924 Craftsmen home.  It's not done yet - I still have to replace the glass and paint the frame - but it's now 100% functional.  That's more than I can for any other window in our entire house.  Most of the other windows can open a little but not all the way.  My next project will be to get them all to 100%.

Should you ever wish to tackle such a project, I highly recommend the book "Working Windows" by Terry Meany.  (Disclaimer: Mr. Meany doesn't know who I am nor do I get a dime for endorsing the book.)

I'll post pics as soon as we can locate the battery charger for the camera.  I know I saw it around somewhere...

Monday, August 9, 2010

Plastic bags

My dish drying rack looks like a jelly fish.  Or maybe a micro version of the Giant Garbage Patch in the Pacific Ocean.


My parents were horrified when they found out that we wash and reuse our baggies.  We don't do it because we're poor, or cheap (though, admittedly, we are quite frugal people).  We do it because plastic bags can be used more than once and they cannot be recycled without the recycle logo on them. 

Why not reuse them until they're good and dead?


The 3 Rs of more sustainable living are Reduce Reuse... and then finally Recycle.  In that order.

We've moved into the Reuse part and are working our way into the Reduce mode when it comes to food bags.  I'm confident that we about 90% into Reduce for shopping bags with only the occasional plastic shopping bag coming home from anywhere.

Our goal is to use no plastic shopping bags at all.  We rarely get bags at the grocery store for anything, unless it's something like grapes where you need a bag.  I recently bought the fabric to make reusable produce bags like these.  I'll show them to you when I get off my butt and actually make them.  I don't mind spending a few extra pennies for the little bit of added weight of a cloth bag compared to a plastic one.

There are lots of products on the market to use as alternatives to plastic bags:

Do you use an alternative to plastic zipper bags?  What are your thoughts?  Some of the challenges are weight (glass) or microwave-ability (metal or resin).  How do you overcome these obstacles?