That said, my goal for 2013 is to simplify my life. While we all miss Marius and his dorky sense of humor - "whoa, I'm so tall now," exclaimed gleefully while standing on his tippy toes in the living room - his departure allows us to re-establish ourselves as a family of three and to find our new normal.
One adjustment is that I will have more time on my hands now. Kaelen goes to sleep so early that I generally get about 3 hours each evening to spend with Gene or to pursue my own interests. Without a chatty, bored teen eager to be entertained I get to again spend time on my blog.
YAY!
Last November I saw a post on some now long-lost blog on how to make your own waxed cloth. A friend who makes her own soaps gave me some beeswax so that I could make her some, too.
Then I got sick.
Then Kaelen got croup.
Then Gene got sick.
Then my illness turned into bronchitis.
Then Gene's went into pneumonia.
Then Christmas... New Year's... school starting up again for Marius... thena mad dash to Do! All! The! Things! with Marius... then Kaelen had a weekend of, shall we just say "intestinal discomfort"... and then and then and then.
Whew. Life is such a whirlwind.
My poor friend has been gently and patiently reminding me of the promised waxed cloths.
So here you go.
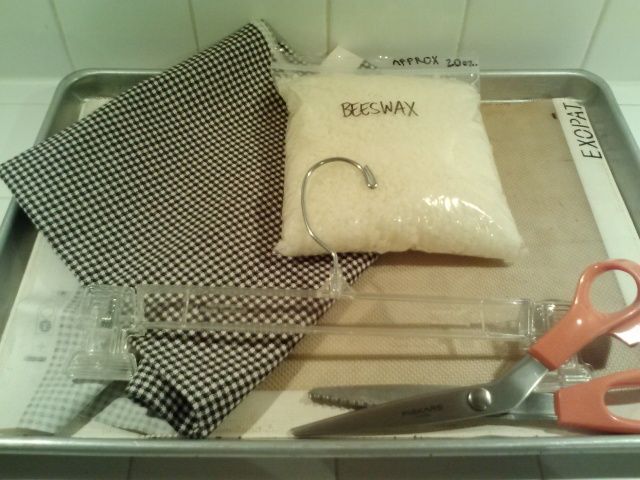
MATERIALS
100% cotton cloth (mine was left over from when I recovered my cedar trunk years ago)
Beeswax - approximately 1 oz/square of cloth
Cookie sheet
Parchment paper or silpat
Pants hanger
Pinking shears
Pastry brush (not shown)
Preheat oven to 170F.
Sprinkle the cloth evenly with the beeswax. Cook your cloth for 9-12 minutes.

At the end of the cooking time, you may need the pastry brush to even out the beeswax.
Quickly remove the cloth from the cookie sheet and hang it up. It will dry and cool within a few minutes.
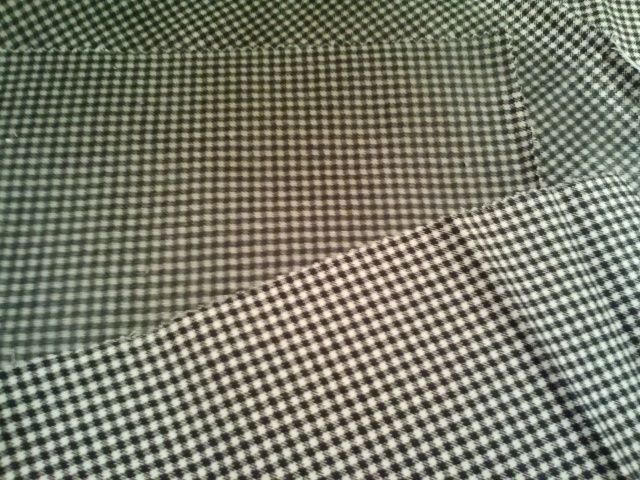
The cloth will darken after being waxed. The top piece has been waxed, the bottom has not.
After they've cooled, use the pinking shears to trim the waxed cloth.
If you want to get all fancy with your finished wraps, look on etsy for ideas on making baggies and wraps for storing and protecting your food. Otherwise use them with rubber bands to keep your food protected in the fridge.
Hand wash your food wrap with soap and cool-warm (not hot) water. This website has lots of care tips for the use and cleaning of waxed products.
If you'd rather buy some waxed food wraps, try the ones over at Abeego. I've never used them but the designs are very pretty and they come with clever attachments for closing them.
I can't wait to start using mine!